The time has come where we need to test all the hardware we have bought to this point.
I have modified some basic test source files to test the WS2812 LEDs, the 4×3 Matrix Keypad and the Arduino Uno
To test the keypad, use the following code.
/* Keypadtest.pde
*
* Demonstrate the simplest use of the keypad library.
*
* The first step is to connect your keypad to the
* Arduino using the pin numbers listed below in
* rowPins[] and colPins[]. If you want to use different
* pins then you can change the numbers below to
* match your setup.
*
*/
#include <Keypad.h>
const byte ROWS = 4; // Four rows
const byte COLS = 3; // Three columns
// Define the Keymap
char keys[ROWS][COLS] = {
{'1','2','3'},
{'4','5','6'},
{'7','8','9'},
{'A','0','B'}
};
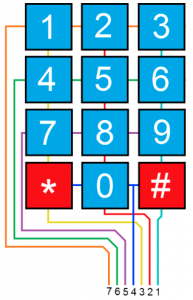
// Connect keypad ROW0, ROW1, ROW2 and ROW3 to these Arduino pins.
byte rowPins[ROWS] = { 8, 7, 6, 5 };
// Connect keypad COL0, COL1 and COL2 to these Arduino pins.
byte colPins[COLS] = { 4, 3, 2 };
// Create the Keypad
Keypad kpd = Keypad( makeKeymap(keys), rowPins, colPins, ROWS, COLS );
#define ledpin 14
void setup()
{
pinMode(ledpin,OUTPUT);
digitalWrite(ledpin, HIGH);
Serial.begin(9600);
}
void loop()
{
char key = kpd.getKey();
if(key) // Check for a valid key.
{
switch (key)
{
case '*':
digitalWrite(ledpin, LOW);
break;
case '#':
digitalWrite(ledpin, HIGH);
break;
default:
Serial.println(key);
}
}
}
This is based on the standard Keypad Test Example File. This assumes that PIN 1 (onwards) from the Matrix is connected to PIN 2 (onwards) on the arduino. Pressing keys on the keypad will send data to the serial monitor in the arduino console and cause an LED to flash.
#include <Adafruit_NeoPixel.h>
#ifdef __AVR__
#include <avr/power.h>
#endif
#define PIN 6
// Parameter 1 = number of pixels in strip
// Parameter 2 = Arduino pin number (most are valid)
// Parameter 3 = pixel type flags, add together as needed:
//   NEO_KHZ800  800 KHz bitstream (most NeoPixel products w/WS2812 LEDs)
//   NEO_KHZ400  400 KHz (classic 'v1' (not v2) FLORA pixels, WS2811 drivers)
//   NEO_GRB     Pixels are wired for GRB bitstream (most NeoPixel products)
//   NEO_RGB     Pixels are wired for RGB bitstream (v1 FLORA pixels, not v2)
//   NEO_RGBW    Pixels are wired for RGBW bitstream (NeoPixel RGBW products)
Adafruit_NeoPixel strip = Adafruit_NeoPixel(16, PIN, NEO_GRB + NEO_KHZ800);
// IMPORTANT: To reduce NeoPixel burnout risk, add 1000 uF capacitor across
// pixel power leads, add 300 - 500 Ohm resistor on first pixel's data input
// and minimize distance between Arduino and first pixel.  Avoid connecting
// on a live circuit...if you must, connect GND first.
void setup() {
strip.begin();
strip.show(); // Initialize all pixels to 'off'
}
void loop() {
// Some example procedures showing how to display to the pixels:
colorWipe(strip.Color(153, 32, 153), 500); // pink-white
colorWipe(strip.Color(153, 153, 153), 500); // white
colorWipe(strip.Color(153, 32, 153), 500); // pink-white
colorWipe(strip.Color(1, 0, 0), 25); // Red
colorWipe(strip.Color(0, 1, 0), 25); // Green
colorWipe(strip.Color(0, 0, 1), 25); // Blue
colorWipe(strip.Color(10, 0, 0), 25); // Red
colorWipe(strip.Color(0, 10, 0), 25); // Green
colorWipe(strip.Color(0, 0, 10), 25); // Blue
colorWipe(strip.Color(25, 0, 0), 25); // Red
colorWipe(strip.Color(0, 25, 0), 25); // Green
colorWipe(strip.Color(0, 0, 25), 25); // Blue
colorWipe(strip.Color(50, 0, 0), 25); // Red
colorWipe(strip.Color(0, 50, 0), 25); // Green
colorWipe(strip.Color(0, 0, 50), 25); // Blue
colorWipe(strip.Color(100, 0, 0), 25); // Red
colorWipe(strip.Color(0, 100, 0), 25); // Green
colorWipe(strip.Color(0, 0, 100), 25); // Blue
colorWipe(strip.Color(153, 0, 0), 25); // Red
colorWipe(strip.Color(0, 153, 0), 25); // Green
colorWipe(strip.Color(0, 0, 153), 25); // Blue
colorWipe(strip.Color(200, 0, 0), 25); // Red
colorWipe(strip.Color(0, 200, 0), 25); // Green
colorWipe(strip.Color(0, 0, 200), 25); // Blue
// Send a theater pixel chase in...
theaterChase(strip.Color(70, 70, 70), 250); // White
theaterChase(strip.Color(70, 0, 0), 250); // Red
theaterChase(strip.Color(0, 0, 70), 250); // Blue
theaterChase(strip.Color(0, 70, 70), 250); // Blue
theaterChase(strip.Color(70, 0, 70), 250); // Blue
theaterChase(strip.Color(0, 70, 0), 250); // Blue
}
// Fill the dots one after the other with a color
void colorWipe(uint32_t c, uint8_t wait) {
for(uint16_t i=0; i<strip.numPixels(); i++) {
strip.setPixelColor(i, c);
strip.show();
delay(wait);
}
}
//Theatre-style crawling lights.
void theaterChase(uint32_t c, uint8_t wait) {
for (int j=0; j<10; j++) {  //do 10 cycles of chasing
for (int q=0; q < 3; q++) {
for (uint16_t i=0; i < strip.numPixels(); i=i+3) {
strip.setPixelColor(i+q, c);    //turn every third pixel on
}
strip.show();
delay(wait);
for (uint16_t i=0; i < strip.numPixels(); i=i+3) {
strip.setPixelColor(i+q, 0);        //turn every third pixel off
}
}
}
}
This is based on the srandtest included with the Adafruit NeoPixel Library (which is required for this to work). This assumes that your DATA pin is 6.